
ACEP Now features one article each issue related to an ACEP eCME CME activity.
Explore This Issue
ACEP Now: Vol 33 – No 12 – December 2014Intravenous access is a simple procedure of paramount importance for many emergency department patients. Although access is usually obtained with ease using the traditional blind technique, there are instances where this may prove to be exceedingly difficult. When this is the case, providers can use ultrasound to visualize and cannulate a peripheral vein. While there may be many barriers to completing this procedure, there are several ways to optimize your chances for success. Below are some tips and tricks for the EM provider that may help to improve the likelihood of success with this potentially difficult and sometimes frustrating procedure.
Literature Review
Placement of peripheral intravenous catheters is a common practice that occurs many times throughout the day in the ED. This is usually done with little to no difficulty. However, with the average BMI of patients on the rise as well as the number of visits to EDs continuing to increase, gaining access may become more difficult. Commonly cited reasons for difficult peripheral IV access include obesity, edema, and IV drug abuse, which unfortunately are prevalent throughout many emergency departments. Luckily, with the evolution of emergency medicine has come an increased use of ultrasound by EPs for bedside diagnostics and procedures. The use of ultrasound for gaining peripheral intravenous access in difficult cases is no exception. Many physicians and departments have looked into using ultrasound when hoping to gain peripheral IV access, but with what success? In 2005, Constantino et al studied 60 adult patients, with 39 in the ultrasound-guided group and 21 in the traditional control group. They found a 97 percent success rate in the ultrasound group versus a 33 percent success rate in the traditional group, with a statistically significant reduction in time to completion, as well as the number of percutaneous punctures in the ultrasound group.1 In a 2009 Pediatric Emergency Care study by Doniger et al, the authors found similar results to Constantino et al, but this time in pediatric patients.2 They studied 50 pediatric patients, with 25 patients in both the ultrasound and traditional access route groups. Again, results showed a trend toward improved overall success, less time to successful cannulation, and fewer attempts in the ultrasound group compared with the traditional group. In 2010, Gregg et al studied similar parameters in surgical ICU patients. The results again showed improved overall success, 99 percent for the ultrasound group, as well as improved first-attempt success (71 percent).3 Further studies were performed in the following years as the trend toward using ultrasound guidance for gaining peripheral access increased in popularity. The majority of the studies supported the use of ultrasound, but others didn’t seem to find a statistically significant improvement in overall success.4 In 2013, Egan et al performed a meta-analysis of all ultrasound-guided peripheral intravenous access papers, which yielded 62 relevant publications but only seven quality papers to review. They found ultrasound guidance increased the likelihood of successful cannulation in difficult-access patients, just as the original studies had found (odds ratio 2.42; 95% confidence interval 1.26–4.68).5 Ultrasound use for procedures within the ED is continuing to gain popularity. EM providers need to become well-versed in the use of ultrasound guidance for placement of intravenous catheters to improve the likelihood of successfully gaining access.

Table 1. Catheter Length Guidelines
Warnings and Complications
Although ultrasound-guided peripheral intravenous access is gaining popularity in emergency medicine, it is not the ideal choice for gaining access in critical patients who need emergent access. All studies conducted on this subject excluded critical patients due to the extended amount of time it takes to obtain ultrasound-guided access. If a critical patient requires emergent intravenous access, you should continue to approach these patients with the traditional peripheral IV approach first, and if you are unable to quickly establish access, then proceed quickly to central venous access or intraosseous (IO) lines.
Ultrasound-guided peripheral venous access has complication rates similar to those of the traditional approach. Several studies show a trend toward improving first-attempt success or decreased number of venipunctures which in theory should lead to less hematoma formation, infiltration, and phlebitis/cellulitis.1-3 The Journal of Critical Care article by Gregg et al reported only five complications out of 148 patients, with phlebitis/cellulitis associated with 0.7 percent, and infiltration present in only 3.4 percent of total intravenous line insertions.3 Even though the complication rate may closely resemble that of the traditional approach, the number of central venous access catheters being placed in the difficult-access patients will decrease, lessening major complications that occur with this procedure. Gregg et al reported that 34 central lines were avoided and 40 were removed as a result of ultrasound-guided peripheral intravenous access being obtained.3 The downstream effect of avoiding long-term placement of central venous access or even avoiding an attempt at the placement of a central line may lead to fewer overall complications.
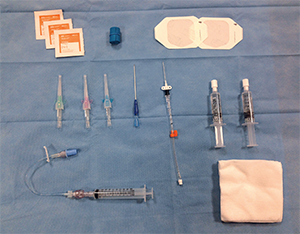
Figure 1. Supplies for ultrasound-guided peripheral venous access.
1 Be Prepared
This may sound simple, but like many other procedures in emergency medicine, preparation is vital to success. Providers should have all the necessary supplies at bedside, with extra or adjunct supplies within arm’s length in case of a more difficult intravenous insertion, as shown in Figure 1. The choice of catheter gauge is up to the discretion of the provider, but prior studies have shown greater success with 18- and 20-gauge catheters. Catheter size should be individualized to the patient. Factors that may influence catheter gauge include vein depth, diameter, and the indication for placing the catheter (CTA, fluid resuscitation, antibiotics, etc.). Gregg et al found greater success rates for ultrasound-guided peripheral intravenous access using guidewire catheters to allow for easier advancement of the catheter once the vein was successfully cannulated.3 Guidewire catheters are readily available in most emergency departments and may improve your chance of successfully gaining peripheral intravenous access.
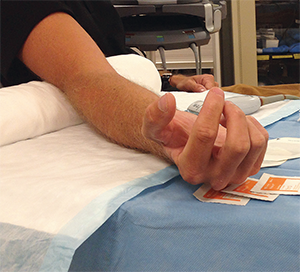
Figure 2. Place an adjustable table under the patient’s arm and a sheet roll directly under the extended elbow.
2 Position the Patient and the Ultrasound
The key to a successful IV catheter insertion under ultrasound guidance is comfort. Both the patient and the provider need to be comfortable from start to finish. The position of the patient’s arm will need to be adjusted depending upon the chosen IV site, but the arm should be held at a height where you do not have to arch your back. Using an adjustable table under the patient’s arm with a sheet roll directly under the extended elbow is an optimal position (see Figure 2). The position of the ultrasound machine is also vital to success. The ultrasound should be placed on the opposite side of the arm being used for IV insertion. The screen should be angled to provide a continuous unobstructed view for real time insertion of the catheter (see Figures 2 and 3).
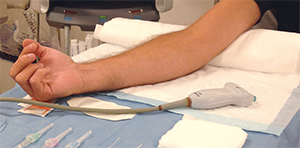
Figure 3. The ultrasound machine should be placed on the opposite side of the arm being used for IV insertion.
3 Use a Waterproof Transparent Dressing to Cover the Ultrasound Probe
Traditional probe covers may be bulky and cumbersome, and visualization may not be optimal depending on both the thickness of the cover and the amount of gel used underneath. By placing a waterproof transparent dressing directly over the probe, the need for the traditional probe cover is obviated. Make sure the transducer is clean and dry before applying, and after the procedure is completed, simply peel away the dressing (see Figure 4).
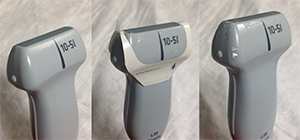
Figure 4. Place a waterproof transparent dressing over the ultrasound probe.
4 Place the Tourniquet High and Tight, or Possibly Place Two
To improve success with peripheral vein cannulation, providers typically use a tourniquet to obstruct the one-way flow of venous blood through valves, thus causing backflow with improved visualization of the target vein and decreased compressibility. Place the tourniquet as close to the axilla as possible when initially searching for an adequate vein. This will lead to better venodilation throughout the arm and will allow for improved visualization of potential cannulation sites. After a preferred site is found, consider placing the tourniquet closer to the desired location. One trick is to place a tourniquet below the target insertion point as well as above the targeted area to help create a closed loop. The two-tourniquet technique forces excess blood into the vein, creating a larger target with improved success rates of peripheral IV insertion. Using a blood pressure cuff inflated to 150 mmHg has also been shown to increase the size and decrease the compressibility of veins, which may also lead to higher rates of cannulation.6
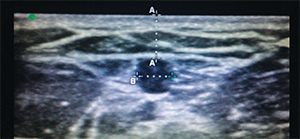
Figure 5. A vessel within the parameters for optimal depth and width for catheter placement.
5 Place the Ultrasound on Shallowest Depth for the Vascular Probe
The peripheral veins regularly targeted for ED catheter placement are often superficial. There will be times when the only available vein runs deeper. It is important to remember that the deeper the targeted vein, the lower your success rate for placing an intravenous catheter. A 2010 observational study in The Journal of Emergency Medicine found that success rates were significantly higher for veins of moderate depth between 0.3 cm and 1.5 cm.7 In the same study, the authors found that depth was not the only measurement that predicted success rates of intravenous catheter insertion. Successful cannulation also vastly improved when the targeted vein diameter was greater than or equal to 0.4 cm2. Figure 5 shows a vessel within the parameters for optimal depth and width based on this study. Placing the ultrasound on the shallowest depth not only encompasses this range, it also narrows the field to those veins with higher success rates. The shallow depth with the vascular probe also allows for an expanded view of the targeted area, allowing for better visualization of the beveled edge of the catheter. When inserting the catheter through the patient’s skin, be sure to keep the bevel tip facing up to allow the ultrasound beam to strike the beveled edge. When the ultrasound beam strikes the beveled edge, it creates artifact that allows for easier visualization of the tip as you cannulate the vein.
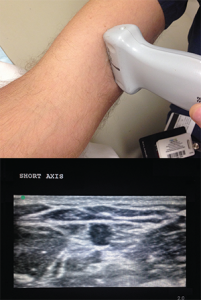
Figure 6. Short-axis positioning.
6 Short Axis Versus Long Axis Approach
The ultrasound probe for intravenous catheter placement can be positioned on two axes, short or long. There are no studies to support greater success with one axis over another, but familiarity with both approaches may help to improve your visualization in real time. In short axis (see Figure 6), a trick to improve visualization of the catheter as you advance through the soft tissue toward the targeted vein is the “tilt to follow” method. Once the target vein is located, tilt the probe so the sonographic beams are angled toward the catheter at initial insertion. Then follow the catheter toward the vein, tilting the probe away from you toward the direction of the catheter as it passes beneath your initial position to a position distal to where the catheter will penetrate the venous wall. Using the “tilt to follow” method will limit the likelihood of advancing the catheter through the posterior venous wall, causing extravasation (see Figure 7). Another approach using the long axis gives you a longitudinal view of the entire length of the targeted vessel (see Figure 8). The sonographic beam is narrow, so you will need to place the catheter tip adjacent to the probe and advance the catheter in the same direction as the probe to be able to follow the beveled tip into the targeted vein.
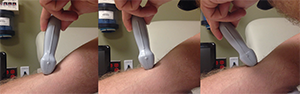
Figure 7. The “tilt to follow” method is ideal for the short-axis positioning.
7 Do the Math
As previously mentioned, depth has been shown to play a role in the successful placement of ultrasound-guided catheters. However, simply recognizing the depth of a vessel is not enough to successfully cannulate a vein. There are several other factors that must be considered. The depth of the vein, the point of catheter insertion, and the angle of entry all play a role in deciding the necessary length of the catheter to be used. Table 1 shows several important values derived from trigonometric functions for catheter insertion at a 45º angle. A prospective study published in The American Journal Of Emergency Medicine showed that although it did take more time to place longer catheters, the rate of failure was only 14 percent versus 45 percent in the short catheter group.8 This highlights the importance of choosing catheters of the correct length for each cannulation, especially when dealing with deeper veins. This may reduce the incidence of failure and extravasation, which are complications associated with ultrasound-guided peripheral lines.
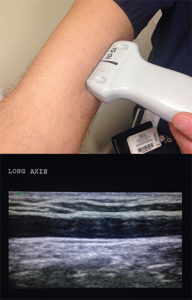
Figure 8. Long-axis positioning.
8 Be Cognizant of Compression
Veins, unlike arteries, lack muscular walls, which allows for easy compressibility. To verify the target vein, compression with the ultrasound probe is encouraged. However, when attempting to successfully place the catheter, be cognizant of the inherent compression that the probe itself may have on soft tissue. In areas with potentially excessive soft tissue, such as the medial bicep, it is important to use minimal compression as this gives a more accurate determination of depth. In the figures, there is not enough compression to collapse the vein but clearly enough to compress soft tissue. What looks like a superficial vessel may in fact be much deeper than initially thought when applying little to no pressure (see Figure 9). This may explain why some ultrasound-guided IVs are prone to extravasation and failure after seemingly successful placement. Understanding this concept and using the appropriate-length catheter may remedy any problems encountered. It is also important to note that excessive compression of the vein may also create a new challenge when attempting cannulation. Many times, the catheter will puncture the posterior wall, leading to extravasation.
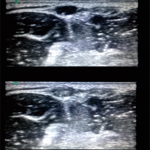
Figure 9. While there is not enough compression here to collapse the vein, there is enough to compress soft tissue.
9 Look Before You Leap
After finding a vein you wish to cannulate, it is important to align the vessel in the middle of the screen while stabilizing the probe in that position. While some transducers have a marker in the center of the probe, others do not, and you must rely on your own judgment of where midline may be. To ensure your entry point is both midline and directly on top of the vessel, you can use the plastic catheter cover to compress the skin at the suspected midline. If the tissue directly above the vessel and the vessel itself compress, then you know you will enter in the appropriate midline location. If compression occurs lateral to the vessel, then you can adjust accordingly. Once you are comfortable with your chosen entry point, you may use the catheter to puncture the skin and cannulate the vein.
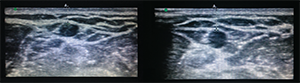
Figure 10. If catheter placement was successful, you will see turbulence inside of the vein when flushing with saline.
10 Verify Your Success
After you have placed an intravenous catheter, there are several ways to assess the integrity of your IV line. Little to no resistance when flushing the line with saline may be a good indicator that placement is correct. However, this may be unreliable. Good blood return may be a better sign that it is in place, but if there is any doubt, simply flush the line with saline under direct visualization with ultrasound. If catheter placement was successful, you will see turbulence inside of the vein when flushing with saline, as seen in Figure 10. You should not see the saline leaking into the surrounding tissues, creating edema. This is a sign of extravasation and line insertion failure.
References
- Costantino TG, Parikh AK, Satz WA, et al. Ultrasonography-guided peripheral intravenous access versus traditional approaches in patients with difficult intravenous access. Ann Emerg Med. 2005;46:456-61.
- Doniger SJ, Ishimine P, Fox JC, et al. Randomized controlled trial of ultrasound-guided peripheral intravenous catheter placement versus traditional techniques in difficult-access pediatric patients. Pediatr Emerg Care. 2009;25:154-9.
- Gregg SC, Murthi SB, Sisley AC, et al. Ultrasound-guided peripheral intravenous access in the intensive care unit. J Crit Care. 2010;25:514-9.
- Stein J, George B, River G, et al. Ultrasonographically guided peripheral intravenous cannulation in emergency department patients with difficult intravenous access: a randomized trial. Ann Emerg Med. 2009;54:33-40.
- Egan G, Healy D, O’Neill H, et al. Ultrasound guidance for difficult peripheral venous access: systematic review and meta-analysis. Emerg Med J. 2013;30:521-6.
- Kule A, Hang B, Bahl A. Preventing the collapse of a peripheral vein during cannulation: an evaluation of various tourniquet techniques on vein compressibility. J Emerg Med. 2014:46:659-66.
- Witting MD, Schenkel SM, Lawner BJ, et al. Effects of vein width and depth on ultrasound-guided peripheral intravenous success rates. J Emerg Med. 2010;39:70-5.
- Elia F, Ferrari G, Molino P, et al. Standard length catheters vs long catheters in ultrasound guided peripheral vein cannulation. Am J Emerg Med. 2012;30:712-6.
 Dr. McNamee is chief resident of the emergency medicine residency at St. Joseph’s Regional Medical Center in Paterson, New Jersey.
 Dr. Jeong is an emergency medicine resident at St. Joseph’s.
 Dr. Patel is associate program director, emergency medicine, at St. Joseph’s.


6 Responses to “10 Tips for Ultrasound-Guided Peripheral Venous Access”
December 13, 2016
Cindy TeslerI agree that intravenous access is a simple procedure that is very important for emergencies. You also said that sometimes, getting access to veins can sometimes be difficult and you need the help of an ultrasound machine. I think it’s a good idea to make sure that the patient is calm and understands what to expect so that you have the best chance of successfully accessing the vein.
December 21, 2016
JordanAgreed. Often times these patient have had several IVs attempted on them already so even acknowledging that and then reassuring them that you will look to find the best possible access point before even attempting to stick them makes a huge difference. Realistic expectations are also important as well as knowing your limits and utilizing a more experienced provider or a PICC team for a midline if available.
June 7, 2017
Ahmed AbdelgawadI think the differences in study results are due to the differences in the experience of the ultrasound procedure operator. In our hospital we can see this clearly. we have a range of 50% up to 99% success rate in the first attempt according to the operator.
July 10, 2017
Dr Aung Htet, MyanmarScanning and locating the vein at the center of probe in short axis view
and inserting needle at the center is a useful method. But there will be some difficulty if there is no center marking on the probe.
Another useful trick is place the vein at the corner of the probe in shortaxis and enter the needle over that corner. Moving the needle in the soft tissue towards the vein will be oriented by correct screen-to-patient orientation of probe.
March 12, 2019
james maxwellI’ve been using US for iv placement for about 8 yrs now. Been an RN for 15 years, am currently a flight RN, have 3yrs ICU experience, 13yrs ER experience, and 1.5yrs of PICC team experience. US for iv placement is an invaluable skill in the critical care setting and as you become proficient you will realize that you can use this skill very effectively in nearly all areas of the ER (including very critical situations)
—here are my tips for someone interested in becoming proficient in using US for iv placement
a) start by going to youtube and watching the video: Ultrasound guided peripheral iv course by siegfried meme.
b) if you don’t have someone on your unit to teach you, shadow your picc team and watch them and pick their brains.
c) familiarize yourself with your units ultrasound machine. focus on the probe(which one to use and how to select it), depth adjusters, and gain.
d) practice! don’t expect to get good if you don’t practice. there are arm models out there. your unit may have one-the picc team may have one. maybe you can get your unit supervisor to order on out of your budget. practice on it. learn to trust that what you are seeing on the screen is what is happening at your fingertips.
e) when you start using US on actual pts, don’t start on legitimately HARD pts; your chance of success will be low and your rate of frustration will be high. start on people you would normally have no problem with getting a traditional iv on. explain to them why you are using US and if they are ok with that. if you have someone there already trained, has them shadow you and ready to step in and take over if you have problems.
f) develop a routine and do it the same every time. you will find that this will save you tons of time in the long run and it will even increase your success rate.
g) selecting the appropriate catheter-VERY IMPORTANT!!! the more catheter in the vessel = less chance of infiltration. unless it is a very superficial vein ( 0.5cm in depth. Kiddos have very elastic vessels which can actually be hard to penetrate. if the depth is good and the vessel is good and straight, don’t be afraid to use a 1.75″ catheter. for infants, i usually use a standard 1″ 22ga catheter. i very rarely use a 24ga b/c they are simply too short (unless its a primi)
h) thoroughly assess the vessel you are going to access. track it up at least the length of the catheter you are going to use. look for any bifurcations or sudden changes of direction which may prevent successful cannulation of that vessel. this includes assessing both arms if you are not completely confident in what you see the first time. take your time!
i) MARK YOUR SPOT! i can’t emphasize this enough! i use the tip of the catheter cover. after orienting your probe and locating your vessel, compress w/the catheter cover on both sides of the vessel until you are certain you are over the vessel. when you are, push down w/enough pressure to leave an indentation. this is your point of entry. if you get in the habit of doing this you’ll find that 9x out of 10 you are right over the vessel (this helps in locating the tip on US before you access the vessel).
j) USE LIDOCAINE! 1%-2% buffered if available but otherwise as is. this procedure relies on being slow and steady. movement of any kind is your enemy and you are doing this w/a sharp object going thru someones tissues. be humane and use lidocaine every time (unless the pt specifically refuses). inject at the middle of the indentation to produce a SQ bleb.
k) locate the tip of needle on US. to become good at this takes practice (see d above). this involves moving the probe and knowing the limitations of the probes field of view (i.e. if you just keep advancing the catheter and don’t move the probe accordingly, you’ll pass beyond the what the probe can “see” and will be advancing the catheter blindly). if you are having a hard time initially seeing the catheter, stop, withdraw the needle just a little bit, wiggle it, and start to advance again and try to see it with the probe.
l) flash does not mean advance the catheter off the needle (a common mistake i see w/many people)! flash means you punctured the vessel wall and nothing more. now you need to locate the tip and orient it to the center of the vessel. once you do that you need to advance the tip while keeping track all the time with the probe. this is where trusting what your seeing on the screen is what is happening at your fingertips. there is absolutely no reason to take your eyes off the screen and look down. after you have located the tip and it’s oriented in the middle of the vessel, advance it until you don’t see it on the screen. NOW STOP advancing the catheter! now move the probe up until you see it again and hold the probe there. repeat this “leapfrog” method 2-3 times before you put the probe down and finish with your cannulation. for really hard pts, sometimes i will use this leapfrog method until the entire catheter is hubbed (that way there is no doubt you have access).
m) short axis (cross cut) view vs long axis view and the “wiggle” test. i use the short axis exclusively. using the long axis is useful i suppose if you want to see how much of the catheter is in the vessel but if you’re really that concerned then you probably didn’t use a long enough catheter or you tried to access too deep of a vessel to begin with. use the short axis view and get good at finding the tip and that is all you will need to ensure successful cannulation. the “wiggle” test is mentioned by some as a way to see if you are in the vessel-find the tip and you’ll know exactly where you are.
n) BE CLEAN!!! too many times i see people using non sterile gel or being careless with the probe. use sterile lube only! when handling the probe, do not allow the sterile tegaderm covered probe to touch anything!
o) stay away from brachial veins and upper vessels w/the exception of upper cephalic veins. learn your anatomy. ONLY use brachial veins (in forearm and above the elbow) when you are 100% confident in your skills!!! as far as the upper vessels go, if you must, ONLY use 6.4cm long catheters and be very cautious of accessing vessels >2cm in depth. remember that when using these vessels you need to account for actual distance to the vessel as well as compression of the tissue when locating the vessel. remember that if you cause an extravasation in an upper vessel, you have put that limb out of commission until the infiltration has resolved (this includes using that extremity for PICC placement). i find these situations mostly arrive at night when resources are more limited. If you find yourself in this position and the pt is truly critical, it is best to get your MD to place a central line.
p) KIDDOS-once you get good you’ll find yourself looking forward to those crazy tense moments of starting pedi ivs b/c you know you’ll most likely get it the first time and you’ll be able to choose where to put it. for kiddos, find your spot and if time permits, use LMX if available and then inject lido to “double numb” the area. the most important part of starting pedi iv’s is the holder(s). i won’t go into all that but just remember that and when the time comes you’ll know how to describe how you want them to hold them.
q) hav fun and keep track of your starts. starting us iv’s is one of my favorite things to do. you’re providing a service that truly reduces pt anxiety and helps them. your co-workers will absolutely appreciate you and look to you first to help get that hard stick. keep track of those stats and you’ll be amazed how good your success rate can become. you’ll find that 9x+/10x success rates the “first time” are realistic and that you’ll very rarely be unable to gain access. GOOD LUCK!!!
July 30, 2025
Leo M.It’s interesting how vein reduction methods now combine technology and wellness. From laser treatments to sclerotherapy, there are safe ways to reduce vein appearance without needing extended downtime or major procedures